Saturday 30 April 2016

Birthday Fishes for Polkadoodles

Hello peeps, hope you're all well.


Remember my mouse card with the holey cheese? Well today I want to show you the other card that I made with the red bubbles paper from the Little Kingdom CD from Polkadoodles.

So this is the paper after I've cut all the holes out with my Craft Robo. It's just begging to have things popping in and out of the holes, don't you think?


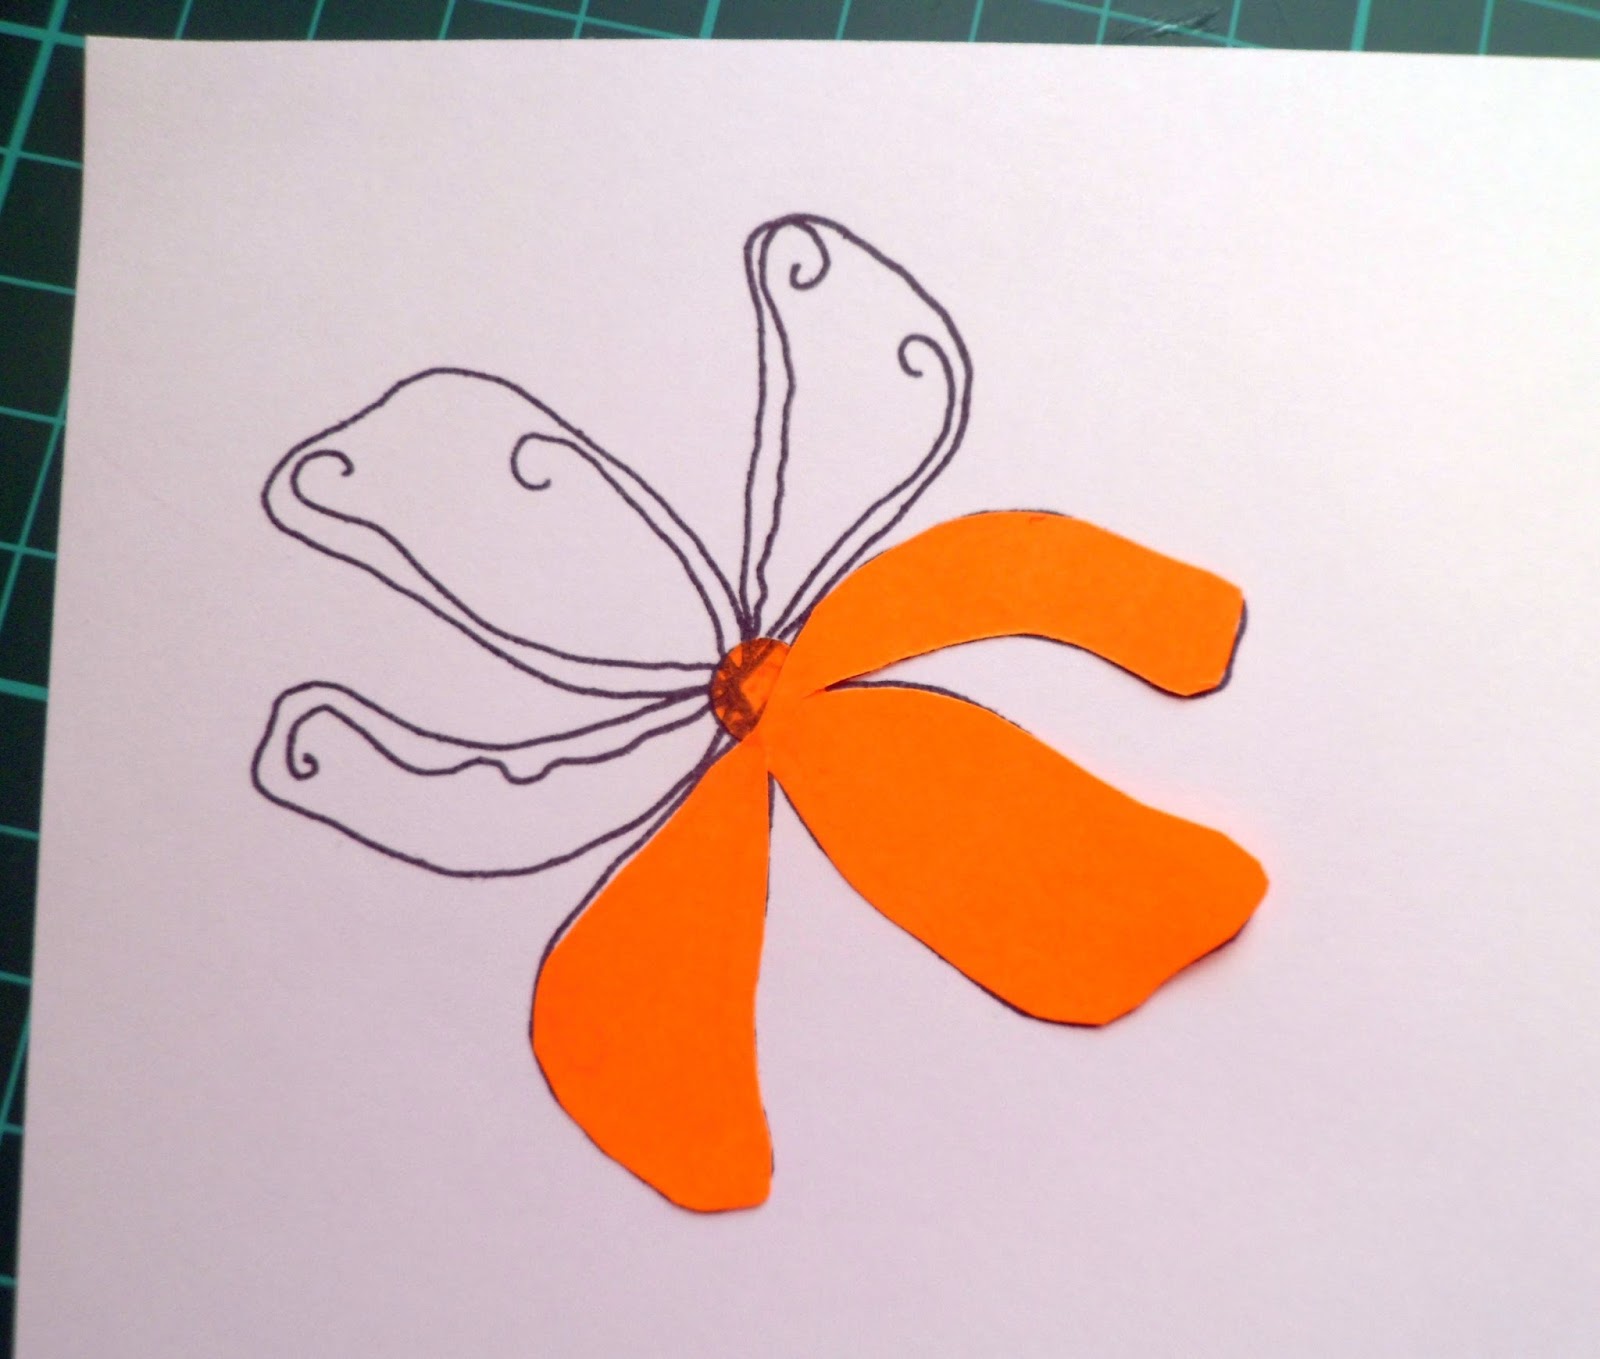
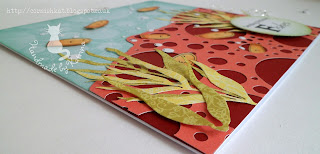
I'm thinking fish because it looks a bit like coral. So I had another look around the CD and, lo and behold, one of the shapes looks like a fish. I printed some off in several different sizes and coloured them in with Graph'It markers 2105 and 2120.


I cut down the 'coral' a bit to give it a more natural shape and then backed it onto some red card. I only glued around the outside at first so that I could slot the fish in easily.


Next I covered a 7x7 card with the pale aqua version of the bubbles paper and glued my coral structure on top. The seaweed is cut from a couple of the green papers on the CD using one of the 'Florist Friend' dies from Sheena Douglass.  To make the fish look more fishy I've just drawn some eyes in with a black fineliner pen and drawn '3's for the fins. Easy peasy :D


Now for the greeting. Since 'fish' sounds like 'wish' I was compelled to go for another pun. There is a lovely 'Sending Birthday Wishes' sentiment on the CD and I pulled it into Craft Artist and used the eraser to remove the 'W' before printing it out. It's all ready for an alphabet die-cut now :D


One last little touch was adding the waste circles (left over from cutting out the 'coral') as bubbles. I just drew little reflections on to make them look more realistic.


And here is the finished card:-


I would like to enter this in the following challenges:-
 Dream Valley Challenges #130 - All Creatures Great and Small
Aud Sentiments Challenge #154 Animals + A Sentiment
Send a Smile for Kids Animal cards
Crafty Sentiment Designs - Birthday
Oddball Art Stamps  Birthday
Sweet Stampin Water 
 Inky Chicks #66 - IT'S BIRTHDAY TIME
Julia Spiri Challenge #17 Anything Goes with an optional twist of For a Child  

Thanks for stopping by,
Katrina x


Friday 29 April 2016

Lemonade Swirls

Hello lovely peeps


 It's mid-challenge reminder time on the Polkadoodles blog today.
The theme this fortnight is 'Swirls and Flourishes'.

My favourite stamp on the Lemonade Fizz Stamp Soup set has some lovely swirls in it, so that was my starting point. I built up some flowers with a few of the stamps in the set, starting with a circle for the centre and masking off as I went.


I coloured the flower in with Promarkers - Pastel Beige, Khaki and Oatmeal - and the stem/leaves with Pear and Umber. To deepen the colour I went over with a Lyra Polycolour Pencil - Vermillion.
(The flower on the right is before the pencil has been added)


 I found a paper with the perfect colour match on the Pretty Tuff CD but needed something pale to mat the flowers onto, so I had a rootle through my small stash of Gelli Plate prints and found this one that was done with the Leafy Swirl stencil from Clarity.


I cut it in half and then tore the edges and filled in a bit with a couple more Lyra pencils - Brown ochre 82 and Van Dyck Brown 76


I layered up my panel and my greeting (also from Stamp Soup) on torn green card and added a couple of die-cut flourishes. They've got a little bit of Golden Sand Embossing Powder from Stampendous on them.


 I would like to enter this in the following challenges:- 
I love Promarkers #307 pastels
AuroraWings Challenge #27 Say it with Flowers
Craftin Desert Divas In The Garden
Creative Moments #92  Always Anything Goes w/optional twist "Showers and/or Rainbows"
SSS Work it wednesday Flowers
Paper Creator's Crafts #46 Polka Dots or Gingham
{Pin}spirational #164 - Inspiration Image

Please pop on over to the Polkadoodles blog to see some more inspiration from my fabulous teamies.
Thanks for stopping by,
Katrina x


Thursday 28 April 2016

Thanks sew much for Sugar Nellie

Hello lovely peeps

 I'm very excited to announce that I have been invited to be on the Sugar Nellie design team for the next four months. Woo hoo! What an honour, I'm very chuffed :D


I came across some lovely sewing themed papers that were free in issue 147 of Papercraft Inspirations magazine. I've printed them off at twice the size onto 120gsm Super Smooth paper.

So, looking for a character to match the theme, I came across this Gorjuss™ stamp -  'I found My Family in a book' - which I used for my Paperchains card last year. I thought this would work equally well for sewing, so this time I've drawn little stitch marks around the dolls.


She's coloured in with my Graph'It markers and then fussy cut.


To decorate the card I used some buttons from my mahoosive collection, and made some cotton reel embellishments using a stamp from a magazine freebie set. I coloured the card and some white cotton with my markers and wrapped the thread around the reels a few times, leaving the ends free. I tied the threads in a knot to keep them in one place.
 

The letters are stamped with Retro alphabet stamps from My Sentiments Exactly and outlined with a black fineliner pen.


I would like to enter this in the following challenges:-
Penny's Paper-Crafty Challenge Blog #275 Sew Charming (stitching on dolls)
Simply Create Too #107- Use Stitching (real or faux)
 Melonheadz Friends Challenge Pastel colours
The Crazy Challenge #221 Buttons
Cardz 4 Galz # 21 Include a Button or 2 or More
Julia Spiri Challenge #17 Anything Goes with an optional twist of For a Child 

Please pop over to the Sugar Nellie blog to see some fabulous inspiration for this month's challenge.

Thanks for stopping by,
Katrina x

Wednesday 27 April 2016

Magic Matchbox for Polkadoodles

Hello again peeps.

 
I'm back with another Polkadoodles sample - this one is using the Magic Garden CD, which includes a template for a Matchbox.

As soon as I saw the template I knew what I wanted to make with it - Craftwork Cards brought out a kit last year to make matchboxes with pop-up flowers, and I've been dying to make one myself.

 I printed off a few matching papers from the CD onto 250gsm white card and then printed the Matchbox Template onto the back of two of them. I made up the outer part of the matchbox with the red stitchy paper, some flowers cut out with my Craft Robo and the first half of one of the lovely sentiments. The 'sun' is just one of the flower centres enlarged and cut out.


The inner tray was made with the white floral pattern and lined with the green gingham (yee ha!). I've added a brad from my stash so you can pull the tray out easily.


I then cut some strips of acetate, folded them in half lengthways and glued on lots more of the flowers. These are then attached to the inside of the tray so they can fold flat.

So, pull the tray out a little for a sneaky peek ...


 ... and then a bit further to reveal the rest of the sentiment. Ta da!


I would like to enter this in the following challenges:-
The Ribbon Girls Use any image
Inspiration Destination  #83 Always Anything Goes
Creative Artiste Challenge #13 "Anything Goes" with an option to use any of "Chipboard, Stencils or Flowers"
Paper Creator's Crafts #46 Polka Dots or Gingham
Kitty Bee Designs #70 - April Showers bring May Flowers 
Not Just Cards  #30 Anything Goes (Always)
Going Grey With Scrap-Creations Spring/Flowers

Thanks for stopping by,
Katrina x


Mice day for Polkadoodles Launch

Good morning peeps, and welcome to my new followers :)


The lovely Nikky Hall from Polkadoodles is launching two fabulous new Stamp & CD collections on Create and Craft* this morning at 10 o'clock. The two sets that launched in March sold like hot cakes and I expect these will do the same, so tune in early :)

* If you watch Create and Craft on Freeview don't forget that they moved channels yesterday from 36 to 23. You might need to retune your Freeview box.

I was incredibly honoured to be asked by Nikky to make some samples for the show and this is one of my favourite makes. My inspiration for this card was a red bubble paper on the Little Kingdom CD - I'd cut out the white holes with my Craft Robo for another project and thought how much it looked like cheese - the holey kind, that is.


I still had my Robo software open so I cut the same pattern out of a lime coloured paper from the CD.


 I then had a hunt around the digis on the CD to see if I could spot anything that looked like a mouse. I found petals that I could use for ears, plus the head/body, little circles for the eyes (I just needed to add black centres) and part of a flourish that looked like a tail. Result!

I dragged everything into CraftArtist to crop the parts I wanted and resize, then assembed the mouse and printed off a group of them in the bottom right hand corner of a piece of Super Smooth card.


This lovely sentiment from the CD contains all the letters I need for my greeting. How lucky is that?

 'Life takes you to unexpected places.
Love brings you Home'

Of course, I had to go with 'mice day' instead of 'nice day' - any opportunity for a bit of pun :D

I mounted the letters on Kraft card to make them stand out a bit more.
 The mice were coloured in with some Promarkers:
 Satin, March Hare, Tan, Sunkissed and Pastel Beige


I would like to enter this in the following challenges:-
Star Stampz Challenge  USE A DIGI
Sassy Studio Designs  #330 Tictactoe (Button, Fake Stitching, Die Cut Cheese)


Ching-chou Kuik Digital Stamps Use Kraft card
 Send a Smile for Kids Animal cards
Passion For Promarkers Challenge  #343 Make it Digi (used Promarkers)
Cutie Pie Challenge #98 WOODLAND FRIENDS!
The Crazy Challenge #221 Buttons
The Ribbon Girls Use any image
Inspiration Destination  #83 Always Anything Goes

Hope you can check back later when I'll have a sample from the other new collection to show you.
Katrina x


Friday 22 April 2016

Let your spirit soar for Leonie

Hello peeps, hope you are well.


This is the first card that I made after I received Leonie's masks and stamps and it was inspired by the kite stamp.

I started off by brayering some blue ink onto some 200gsm 'Stamp and Colour' card (Stamps Away), with the darker shade blending in at the bottom.


Next I built up my word 'soar'. I didn't have a stamp that I could turn into an R so I decided to letter-press one of the small 'aRt' masks. Since this was the part I was most likely to muck up, that is where I started.

I placed the word face down onto scrap paper and then covered up the 'a' and the 't' with low tack masking tape.


I then inked the 'R' with black Memento ink.


After (very carefully) peeling away the masking tape, I turned the word over and placed it inky side down on my brayered card. I gave it a good rub all over to the transfer the ink.


I built my 'A' with the branch stamp from the Branching Out set.  I didn't want to stamp the whole length of it so I masked off my background with some copy paper.


For the 'S' and 'O' I used a swirl and a circle stamp from Tangled Tails and Arrow to the Heart.

I finished off with the kites stamp and then coloured in the kites with a Graph'It marker (7210).


I cut the card down to a square, ready to mount onto a 7"x7" card, but it needed something to frame it. I stamped the bubble cluster from Arrow to the Heart all around the edge of some stiff white card and filled in the gaps with circles of my own using a black fineliner pen (.005)


I went around the edges with a black promarker before attaching to my base card. My topper was a bit flimsy to use the same method for getting a black outline, so I cheated and mounted it on black card with a very small border.


Pretty chuffed with it so far, but the 'message' is a bit obscure so I need to write some extra wording on.

Gulp.

I photocopied the design at this point so I could practice without mucking up my card :D

Several attempts later...


As Leonie often says, I then fell out with it. As lovely as the kite image is, it's not in proportion with my card and there's too much empty space.

I cut some kite shapes from patterned paper (the 6x6 Paper Firefly pad from Prima) and doodled around the edges. I attached white wire to the backs and glued on little paper bows with tiny dots of cosmic shimmer glue (my new favourite adhesive)


I would like to enter this in the following challenges:-
 Through The Craft Room Door - Always Anything Goes
Penny's Paper-Crafty Challenge Blog #274 Anything Goes
The Sisters of Craft  Always Anything Goes
Classic Design Team Challenge #1 Anything Goes
Dragonfly Dreams  Spring is in the Air
We Love 2 Create #8 Anything Mixed Media Goes
Open-Minded Challenges #4  Easter / Spring / Pastel Colors
Addicted to Stamps #124 PASTEL COLOURS
SSS Work it wednesday Pastels
 Pile It On  #106 - Doodle
CAS(E) This Sketch!  #168  Sketch
 
AAA #62: Anything Goes

 
Thanks for stopping by,
Katrina x


Thursday 21 April 2016

Squid Soup and Shaker tutorial

Hello lovely peeps, and welcome to my new followers.
I'm chuffed to bits because I've now reached 50 Google Connect followers (the neat freak in me likes round numbers :D  )


Yesterday I had a chance to play with my new Lemonade Fizz Stamp Soup stamps from Polkadoodles.


The idea is that you build up your own flowers etc. with the individual stamps. There is also a CD to accompany it with some other digi stamps, sentiments etc. and papers with a pink/aqua colour theme.
 
I just started stamping on scrap paper first to see what flowers I could make


But then I got waylaid because I spotted a squid :D


The idea of making a male card from floral stamps and papers really appealed to my quirky side, so I set about making a shaker card with an underwater theme. I've included instructions for those who've never made a shaker card before.

I stamped the largest flower onto green diamond paper and cut out the middle petal for the squid body. I traced it twice onto my card (which is covered with the stripy aqua paper) in pencil so I could see where to stamp my tentacles.


I stamped various leaves onto other Lemonade Fizz papers and cut them out for my seaweed.


The next step was to make the shaker frame.

To make it more sturdy I glued the paper onto some card with Collall photo glue and die-cut a circle from the middle using a large X-Cut circle die.


Next I glued a square of acetate onto the back with Collall all-purpose glue (it sticks to glass among other things, so I figured it would work on acetate)

I added a double height of adhesive foam on a roll as I find that if you only use a single layer then your shaker bits get wedged in and won't move.


I arranged my seaweed around the front of the frame and attached with Cosmic Shimmer glue for speed.


When you're ready to assemble just sprinkle your sequins etc.  in the middle of your base card,


then peel off the backing tape from the foam and carefully position the frame over the top.


Just realised that the eyes are in the wrong place for squid but it's too late to move them now.  Never mind, I'm sure you get the idea.

I would like to enter this in the following challenges:-
Suzy Bee's Bloomin' Challenge #126: anything goes with a twist ...Make it Male
Mod Squad Challenge -Water, Water, Everywhere
Paper Shelter Challenge #245 - For the Boys
Craftin Desert Divas  Shake it up
Scrapbook Stamp Society Challenge Blog  #89 Anything goes option Flowers
Crafty Girls Creations   Always Anything Goes
Crafting for all Seasons  #124 tic tac toe (sparkly sequins, stamp, backing paper)

Tinker- Dream  #40 Shaker Card 

I'm going to spend the rest of the day giving my craft room a long overdue tidy :D


Whatever you're doing I hope you have a good day,
Katrina x